 https://per-vurt.com/wp-content/uploads/2020/11/Velocity-Banner-Final.png
308
531
G-Mohris
https://per-vurt.com/wp-content/uploads/2019/10/Final-Logo-Header.png
G-Mohris2020-11-26 22:04:002021-01-19 12:57:29ABLETON LIVE GUIDE | VELOCITY
https://per-vurt.com/wp-content/uploads/2020/11/Velocity-Banner-Final.png
308
531
G-Mohris
https://per-vurt.com/wp-content/uploads/2019/10/Final-Logo-Header.png
G-Mohris2020-11-26 22:04:002021-01-19 12:57:29ABLETON LIVE GUIDE | VELOCITYAbleton Live Velocity
The Ableton Live Velocity MIDI Effect device is included in Live. Mainly, it can alter incoming MIDI note velocity values (1-127) in either a controlled or random manner. Moreover, this device functions on MIDI “Note On” or “Note Off” messages, or both, depending on the setting of the “Operation” chooser.
In fact, the Velocity MIDI Device can be very useful when you want to block incoming notes that are higher or lower than a certain value. Additionally, it can adjust the velocity sensitivity of these notes whether limiting them or boosting them to a specific value.
Moreover, Velocity allows you to generate random velocity values of any incoming note. Therefore it contributes in creating magic on the audio signal.
Similarly, this device can work on light systems. For instance, it can control the intensity, color, and the movement of the light system in respect to the velocity of the notes the performer is playing.
To conclude, there is so much to do with “Velocity” especially when it is combined with other devices. Therefore, we at Per-vurt DJ & Music Production School focus a lot on explaining the different creative uses of this device. Finally, check out all about this MIDI effect on today’s Ableton Live Velocity guide.
FEATURES
-
Incoming MIDI
This is a velocity meter that shows the velocity value of the incoming MIDI notes prior to reaching the Velocity Device
-
MIDI Output
Displays the velocity information of the MIDI notes after leaving the device.
-
Velocity Curve
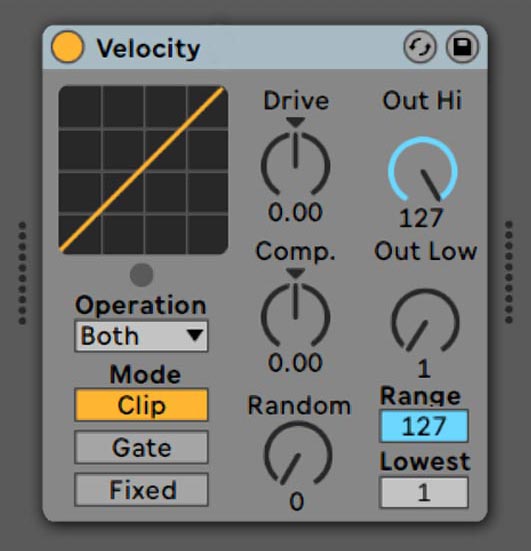
Shows how the incoming note velocities (X-axis) are remapped by the device to create the output velocities (Y-axis).
-
Operation
Selects whether the velocity effect should apply to MIDI “Note On” messages, or to MIDI “Note Off” messages, or to both.
-
Mode
What happens to incoming notes that are outside of the range set with the “Range” and “Lowest” controls? In fact, this depends on which “Mode” is selected.
Above all, this switch determines what happens to the incoming notes whose velocities are not within the range defined by the “Range” and “Lowest” controls. For instance, “Clip Mode” clips note velocities so that they remain in range; However, “Gate Mode” will block notes whose velocities are outside of the range. Finally, “Fixed Mode” will remap all the note velocities to the value of the “Out Hi” control.
-
Out Hi/Low
These knobs define the range of note velocities which can be output from the device. Therefore, the velocities are represented by the Y-axis of the display.
-
Range & Lowest
Define the range of note velocities which will be accepted by the device. For instance, “Lowest” sets the lowest accepted velocity value, which “Range” adds to. Moreover, incoming velocities are shown by the X-axis of the display. In fact, notes with velocities outside of this range are still accepted if the device is in “Clip” or “Fixed” mode. However their velocities are transformed in value.
-
Drive
Positive Drive values push velocities into the upper ranges. As a result, most notes will play loudly. On the other hand, with negative Drive values, the velocities will be kept in the lower ranges, therefore the notes will play softly.
-
Random
Adds or subtracts a random value to all velocities. Moreover, it is represented by a gray area on the display curve.
-
Compand
Firstly, it is a compressor. Secondly, it is an expander. For instance, when the values are set above zero, it will force the incoming notes to locate to the outer boundaries of the curve, and therefore they will play either loudly or softly. On the other hand, if values are set below zero, the velocities will be pushed towards the middle range.


